|
It is currently Fri Apr 26, 2024 5:39 pm |
|
All times are UTC - 7 hours [ DST ] |
|
|
Page 4 of 9 |
[ 261 posts ] | Go to page Previous 1, 2, 3, 4, 5, 6, 7 ... 9 Next |
| Print view | Previous topic | Next topic |
Project Downward Spiral
| Author | Message |
|---|---|
|
Official CCB Member   Joined: Tue Oct 05, 2010 10:17 pm Posts: 568 Images: 0 Location: Golden |
If you do the other side, cut out the quarter all the way around close to the edges...now you have room to drill out or grind out the welds
_________________ Your sh!* is my bread and butter! |
| Wed Jun 29, 2016 5:33 pm |
|
|
Official CCB Member Joined: Sat Oct 02, 2010 9:41 pm Posts: 1201 Location: Erie |
_________________ 1975 Ranger Edition that I've had longer than I've been without it. |
| Wed Jun 29, 2016 5:50 pm |
|
|
Official CCB Member  Joined: Fri Oct 14, 2011 12:16 am Posts: 3942 Location: Denver, Wash Park Area |
Did the same used the nibbler and left 1-2" on all three sides.
_________________ 1976 Bronco "Green, Yellow, whatever", 1969 Bronco "Red", 1972 Bronco Stocker "Kind of Blue/Grayish" |
| Wed Jun 29, 2016 11:00 pm |
|
|
Official CCB Member Joined: Sat Oct 02, 2010 9:41 pm Posts: 1201 Location: Erie |
Back from vacation and a hellish week at work. Took of the body molding to get at a rust spot. Was bigger than I thought so had to make a patch.
 Welded in and some grinding.  The back side. Need to clean it up a little but nothing major. It will be hidden behind the Ranger panels.  Started the test fitting of the new quarter. Really hard to think about going cut. Wife likes the uncut look as well.  Hopefully can get it in today still. Sent from my HTC One using Tapatalk _________________ 1975 Ranger Edition that I've had longer than I've been without it. |
| Sat Jul 16, 2016 12:24 pm |
|
|
Official CCB Member Joined: Sat Oct 02, 2010 9:41 pm Posts: 1201 Location: Erie |
Well dang, it's been a long time since I've posted on this. I really haven't made much progress thanks to work and kids sports. Now that soccer and football are over, I'm ready to get back into this (it didn't help that I had to swap out the starter in our Sequoia which was such a PITA I didn't want to touch a car again for a bit).
I did a few little things over the past 2-3 months since I last posted. I filled in a few little rust holes in the wheel well by using a copper backing. This was much easier than replacing the entire wheel well for just a few pin holes. Now, I'm at the point where I have to really evaluate where I'm going with this project. I know I don't have the money to do a full frame off so I have to choose my steps carefully since I'm doing body work. I haven't put the rear quarter in and I'm curious as to what else I should do while it's off? I'm thinking I should do any prime/undercoat/paint in the wheel well before I put the quarter in permanently. There is old paint and a bit of old undercoating there. Do I need to wire wheel the old stuff out completely? I'll try to get some pictures tomorrow (too lazy watching baseball at the moment to do so). If I get the old undercoating stuff out, can I just epoxy prime it then shoot it with something? I'm totally new at this body work stuff and really don't understand how/when I should do certain steps at this point. Would love to hear from others how they did the paint prep as they were doing their body work. Thanks! _________________ 1975 Ranger Edition that I've had longer than I've been without it. |
| Sun Oct 30, 2016 8:45 pm |
|
|
Official CCB Member Joined: Sat Oct 02, 2010 9:41 pm Posts: 1201 Location: Erie |
Well, work travel is really starting to get in the way. Just got back from Seattle and get to go to Boston next week. Anyways, here is a pic of the wheel well. I'm thinking I should scrape the old undercoating off and spray new on. For areas with bare metal, I should spray epoxy primer first then some paint then the undercoating. Does that sound correct?
 Sent from my HTC One using Tapatalk _________________ 1975 Ranger Edition that I've had longer than I've been without it. |
| Sat Nov 12, 2016 11:50 am |
|
|
Official CCB Member  Joined: Mon Jan 03, 2011 6:07 pm Posts: 4074 Location: Gardnerville, NV |
I wouldn't do a bunch of undercoating. The stuff is ok, but if water gets underneath it, it can't get back out and rust starts.
I'd scrape or wire wheel the loose crud off. Depending on how much bare metal there is, I'd use an etching primer & rattle can paint the wheel wells. Nothing fancy. Both etch & epoxy primer is designed to stick to bare metal. Epoxy is 2 parts, more for professional use, and needs a proper spray gun to apply. Etch primer is available at most hardware stores in a spray can. We use a lot in the body shop. We rarely epoxy prime anything, unless its a huge amount of bare metal. _________________ "America is at that awkward stage. It's too late to work within the system, but too early to shoot the bastards." – Claire Wolfe 74-AWB 98", ZF5, Atlas4, TGW HP1060 and HP1014 axles, ARBs, 37's, 3.5" lift-5.5" front coil springs, Tahoe rear springs, EFI 302, h-boost, York OBA, 4x4x2, custom dash & gauges 72 U15- Explorer Sport-Candyapple Red (1 of 141) |
| Sat Nov 12, 2016 12:16 pm |
|
|
Official CCB Member Joined: Sat Oct 02, 2010 9:41 pm Posts: 1201 Location: Erie |
Thanks, I was looking at Eastwood and they had both primers in spray cans. I thought epoxy was supposed to be better but I'm good with etch.
I need to spray a lot of the work I've done anyways, just want to do it as right as possible. Sent from my Venue 8 7840 using Tapatalk _________________ 1975 Ranger Edition that I've had longer than I've been without it. |
| Sat Nov 12, 2016 3:08 pm |
|
|
Official CCB Member Joined: Mon Jan 03, 2011 6:07 pm Posts: 4074 Location: Gardnerville, NV |
I wouldn't consider either better or worse, just different. I've seen whole hoods misted with etch and then primed & painted. If you are referring to my experience with the HNR falling off the etch primer, that experience says more about the HNR than etch prime. I wouldn't hesitate to use etch, at all.
_________________ "America is at that awkward stage. It's too late to work within the system, but too early to shoot the bastards." – Claire Wolfe 74-AWB 98", ZF5, Atlas4, TGW HP1060 and HP1014 axles, ARBs, 37's, 3.5" lift-5.5" front coil springs, Tahoe rear springs, EFI 302, h-boost, York OBA, 4x4x2, custom dash & gauges 72 U15- Explorer Sport-Candyapple Red (1 of 141) |
| Sat Nov 12, 2016 3:55 pm |
|
|
Official CCB Member Joined: Sat Oct 02, 2010 9:41 pm Posts: 1201 Location: Erie |
Well, after digging into the wheel well more, there was more rust tucked up in there than I was happy with and knowing that this is the right time to do something about it, I went about taking out the wheel well.
Now, in retrospect, I probably should have just cut as much out as possible then just ground out the spot welds versus just hitting everything with the spot weld cutter on the drill. It probably would have saved me a considerable amount of time but I was wanting to be careful in case the rust wasn't as bad as I thought and the wheel well was salvageable. In all honesty, it probably is but if the Hut has it in stock, I'll probably pick it up cause it would take me a while just to section everything. I still will have to section a part of the upper quarter to save it. You can see it in the pics below. Hopefully will get more time to work on it this week since I have the entire week off of work which is nice since I've been on the road for the past two weeks (including seeing Rox at DIA but not being able to say hi cause we were both on calls). Here are the pics!  Upper quarter rust that needs to be fixed:  Edge of wheel well that had rotted out:  Top view of the rear section of the wheel well. Good sized rust hole that I wasn't able to previously get to with the copper pad (it was too big anyways):  Top view of the front section of the wheel well:  Rear lower area that had rusted out:  _________________ 1975 Ranger Edition that I've had longer than I've been without it. |
| Sun Nov 20, 2016 6:16 pm |
|
|
Official CCB Member Joined: Mon Jan 03, 2011 6:07 pm Posts: 4074 Location: Gardnerville, NV |
You are probably time ahead just replacing the wheel well. When I cut them out of my truck I was amazed how much I was able to move the quarter panel around. Make sure you measure bed-rail to bed-rail & maybe brace it at the correct measurement, before you weld the new wheel well in. I think the measurement is 56" (off the top of my head-don't trust it 100%). Check your door fit & tailgate gaps before burning everything together.
_________________ "America is at that awkward stage. It's too late to work within the system, but too early to shoot the bastards." – Claire Wolfe 74-AWB 98", ZF5, Atlas4, TGW HP1060 and HP1014 axles, ARBs, 37's, 3.5" lift-5.5" front coil springs, Tahoe rear springs, EFI 302, h-boost, York OBA, 4x4x2, custom dash & gauges 72 U15- Explorer Sport-Candyapple Red (1 of 141) |
| Sun Nov 20, 2016 7:13 pm |
|
|
Official CCB Member Joined: Sat Oct 02, 2010 9:41 pm Posts: 1201 Location: Erie |
I still have all my supports welded in so things shouldn't have moved but I will double check all the measurements. I agree I'll be time ahead. I might try to fix the wheel well anyways just as practice. :)
Sent from my Venue 8 7840 using Tapatalk _________________ 1975 Ranger Edition that I've had longer than I've been without it. |
| Sun Nov 20, 2016 9:25 pm |
|
|
Official CCB Member  Joined: Sun Oct 10, 2010 12:04 am Posts: 6198 Images: 0 Location: Lakewood |
What gunni said. It's $65 well spent. The one I got from them was good quality.
|
| Sun Nov 20, 2016 9:34 pm |
|
|
Official CCB Member Joined: Sat Oct 02, 2010 9:41 pm Posts: 1201 Location: Erie |
I was able to borrow Justin's sheet metal brake which made it possible to bend up the patch for the upper quarter. There was a bit of rust that I probably could have just backed with some copper plate and filled in but cutting it out and welding in new steel was the right thing to do.
Here is the piece that I cut out:  Here you can see upper quarter with the piece removed:  Here is the patch being test fitted:  Here is the initial spot welds. I'm definitely getting better with this. I watched a YouTube video on welding where the guy suggested going up in wire speed and voltage to the next gauge of metal that you are trying to weld (i.e. set for 16ga when welding 18ga). This allows for better penetration. I definitely thought it made it easier.  Here is the finished weld, pre-flap disk. 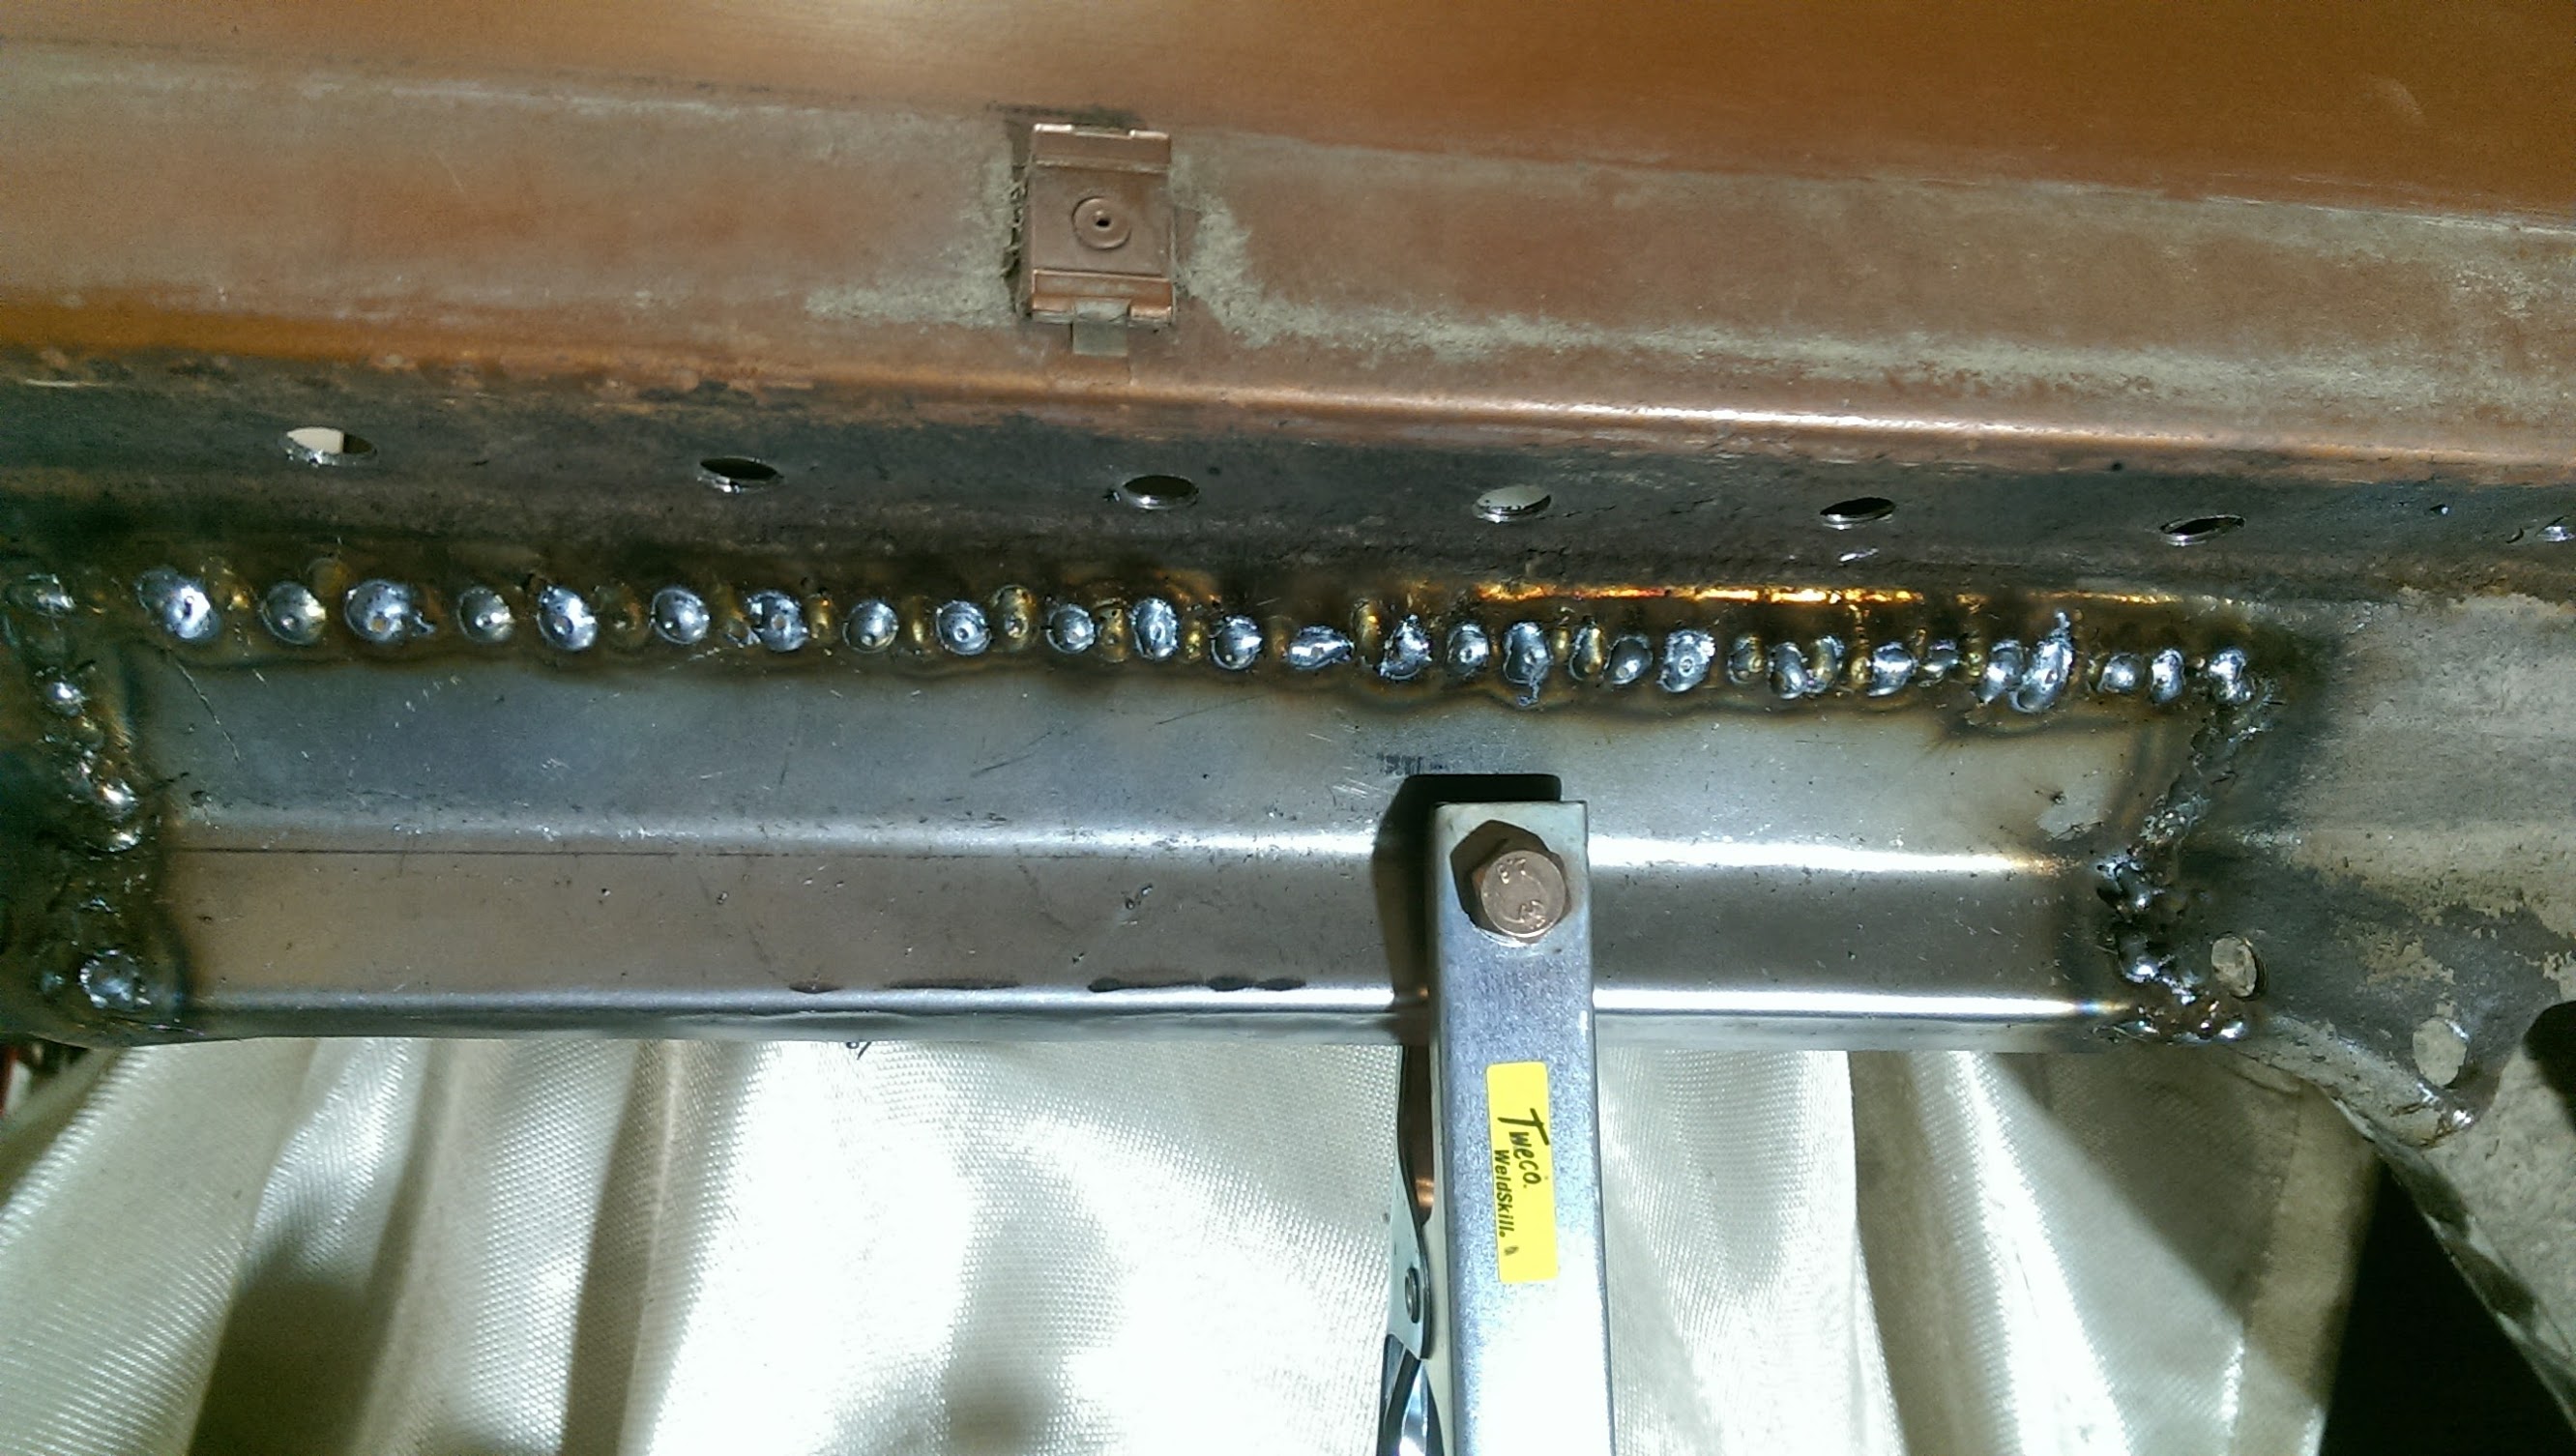 Here it is after a little bit of work with a worn out flap:  I need to clean up the inside then I can get the new wheel well back in. Slow but steady. _________________ 1975 Ranger Edition that I've had longer than I've been without it. |
| Fri Nov 25, 2016 9:13 pm |
|
|
Official CCB Member Joined: Sun Oct 10, 2010 12:04 am Posts: 6198 Images: 0 Location: Lakewood |
Nice!
|
| Fri Nov 25, 2016 10:32 pm |
|
|
Official CCB Member Joined: Sat Apr 19, 2014 5:40 pm Posts: 916 Location: Bailey |
Looking good
|
| Sat Nov 26, 2016 8:41 am |
|
|
Official CCB Member Joined: Sat Oct 02, 2010 9:41 pm Posts: 1201 Location: Erie |
Well, it's been cold, I've been busy with work, blah, blah, blah.
I got off my duff and in an effort to get some of the stuff I won't be needing out of my garage, I pulled the GT40 heads from the Explorer motor I bought with the original intent of swapping it in. Here are the heads (look familiar to a few others?):    When I pulled the heads off, I was surprised at how little of a ridge there was on the cylinders. I can't really feel it with my finger nail but you kinda can feel something if you run your finger over it. The 351w I got has a distinctive ridge at the top that I can feel with my finger nail. There is some dust/crap that slid in to the cylinders from when I pulled the heads. Here are some shots of the 5.0:   So, do I need to take the 351w block to a machine shop to determine how much work is needed? Or is there someone in the club that has the tools to be able to determine if the block needs to be gone through? I realize that since I have it out and down to a short block, the effort isn't much to take it in, it's more a budget thing. I'm trying to decide if I spend the next few months getting the engine together while it's cold before I start back up on the body work since I can't really spray anything due to the cold. If you can help, let me know. I can offer up good beer or coffee or if it's more time intensive than I'm thinking, let me know. _________________ 1975 Ranger Edition that I've had longer than I've been without it. |
| Sat Dec 24, 2016 1:35 pm |
|
|
VENDOR   Joined: Sun Dec 15, 2013 8:22 pm Posts: 442 Location: Arvada |
I'd say if you hang a nail on the ridge then it's destined for the machine shop.
|
| Mon Dec 26, 2016 12:12 am |
|
|
Official CCB Member Joined: Sat Oct 02, 2010 9:41 pm Posts: 1201 Location: Erie |
More metal gone. Pulled the rear gas filler protector. Not a lot of rust but easier to pull now and be done with it.
 Also pulled the brace that goes from the body brace to the taillight housing. Going to make this piece out of sheet metal.  Slowly making progress. Sent from my HTC One using Tapatalk _________________ 1975 Ranger Edition that I've had longer than I've been without it. |
| Sun Jan 22, 2017 2:34 pm |
|
|
Official CCB Member Joined: Sat Oct 02, 2010 9:41 pm Posts: 1201 Location: Erie |
Just had a short period of garage time today. Made up the rear brace that goes from the body to the tail light housing. Still need to clean up the housing in order to weld this in.
Pic of the new one next to the old.  Sent from my HTC One using Tapatalk _________________ 1975 Ranger Edition that I've had longer than I've been without it. |
| Sun Jan 29, 2017 5:23 pm |
|
|
Official CCB Member Joined: Sat Oct 02, 2010 9:41 pm Posts: 1201 Location: Erie |
Time for another update. A few of you at the breakfast yesterday heard my plan about trying to get the passenger side demo'd this weekend and getting all of the new sheet metal in next weekend on Memorial Day weekend. I made significant progress towards that today.
On the list to replace: Inner fender apron, kick panel, door post, inner and outer rocker. Then anything else that I uncover during the process. Here is what I started with: 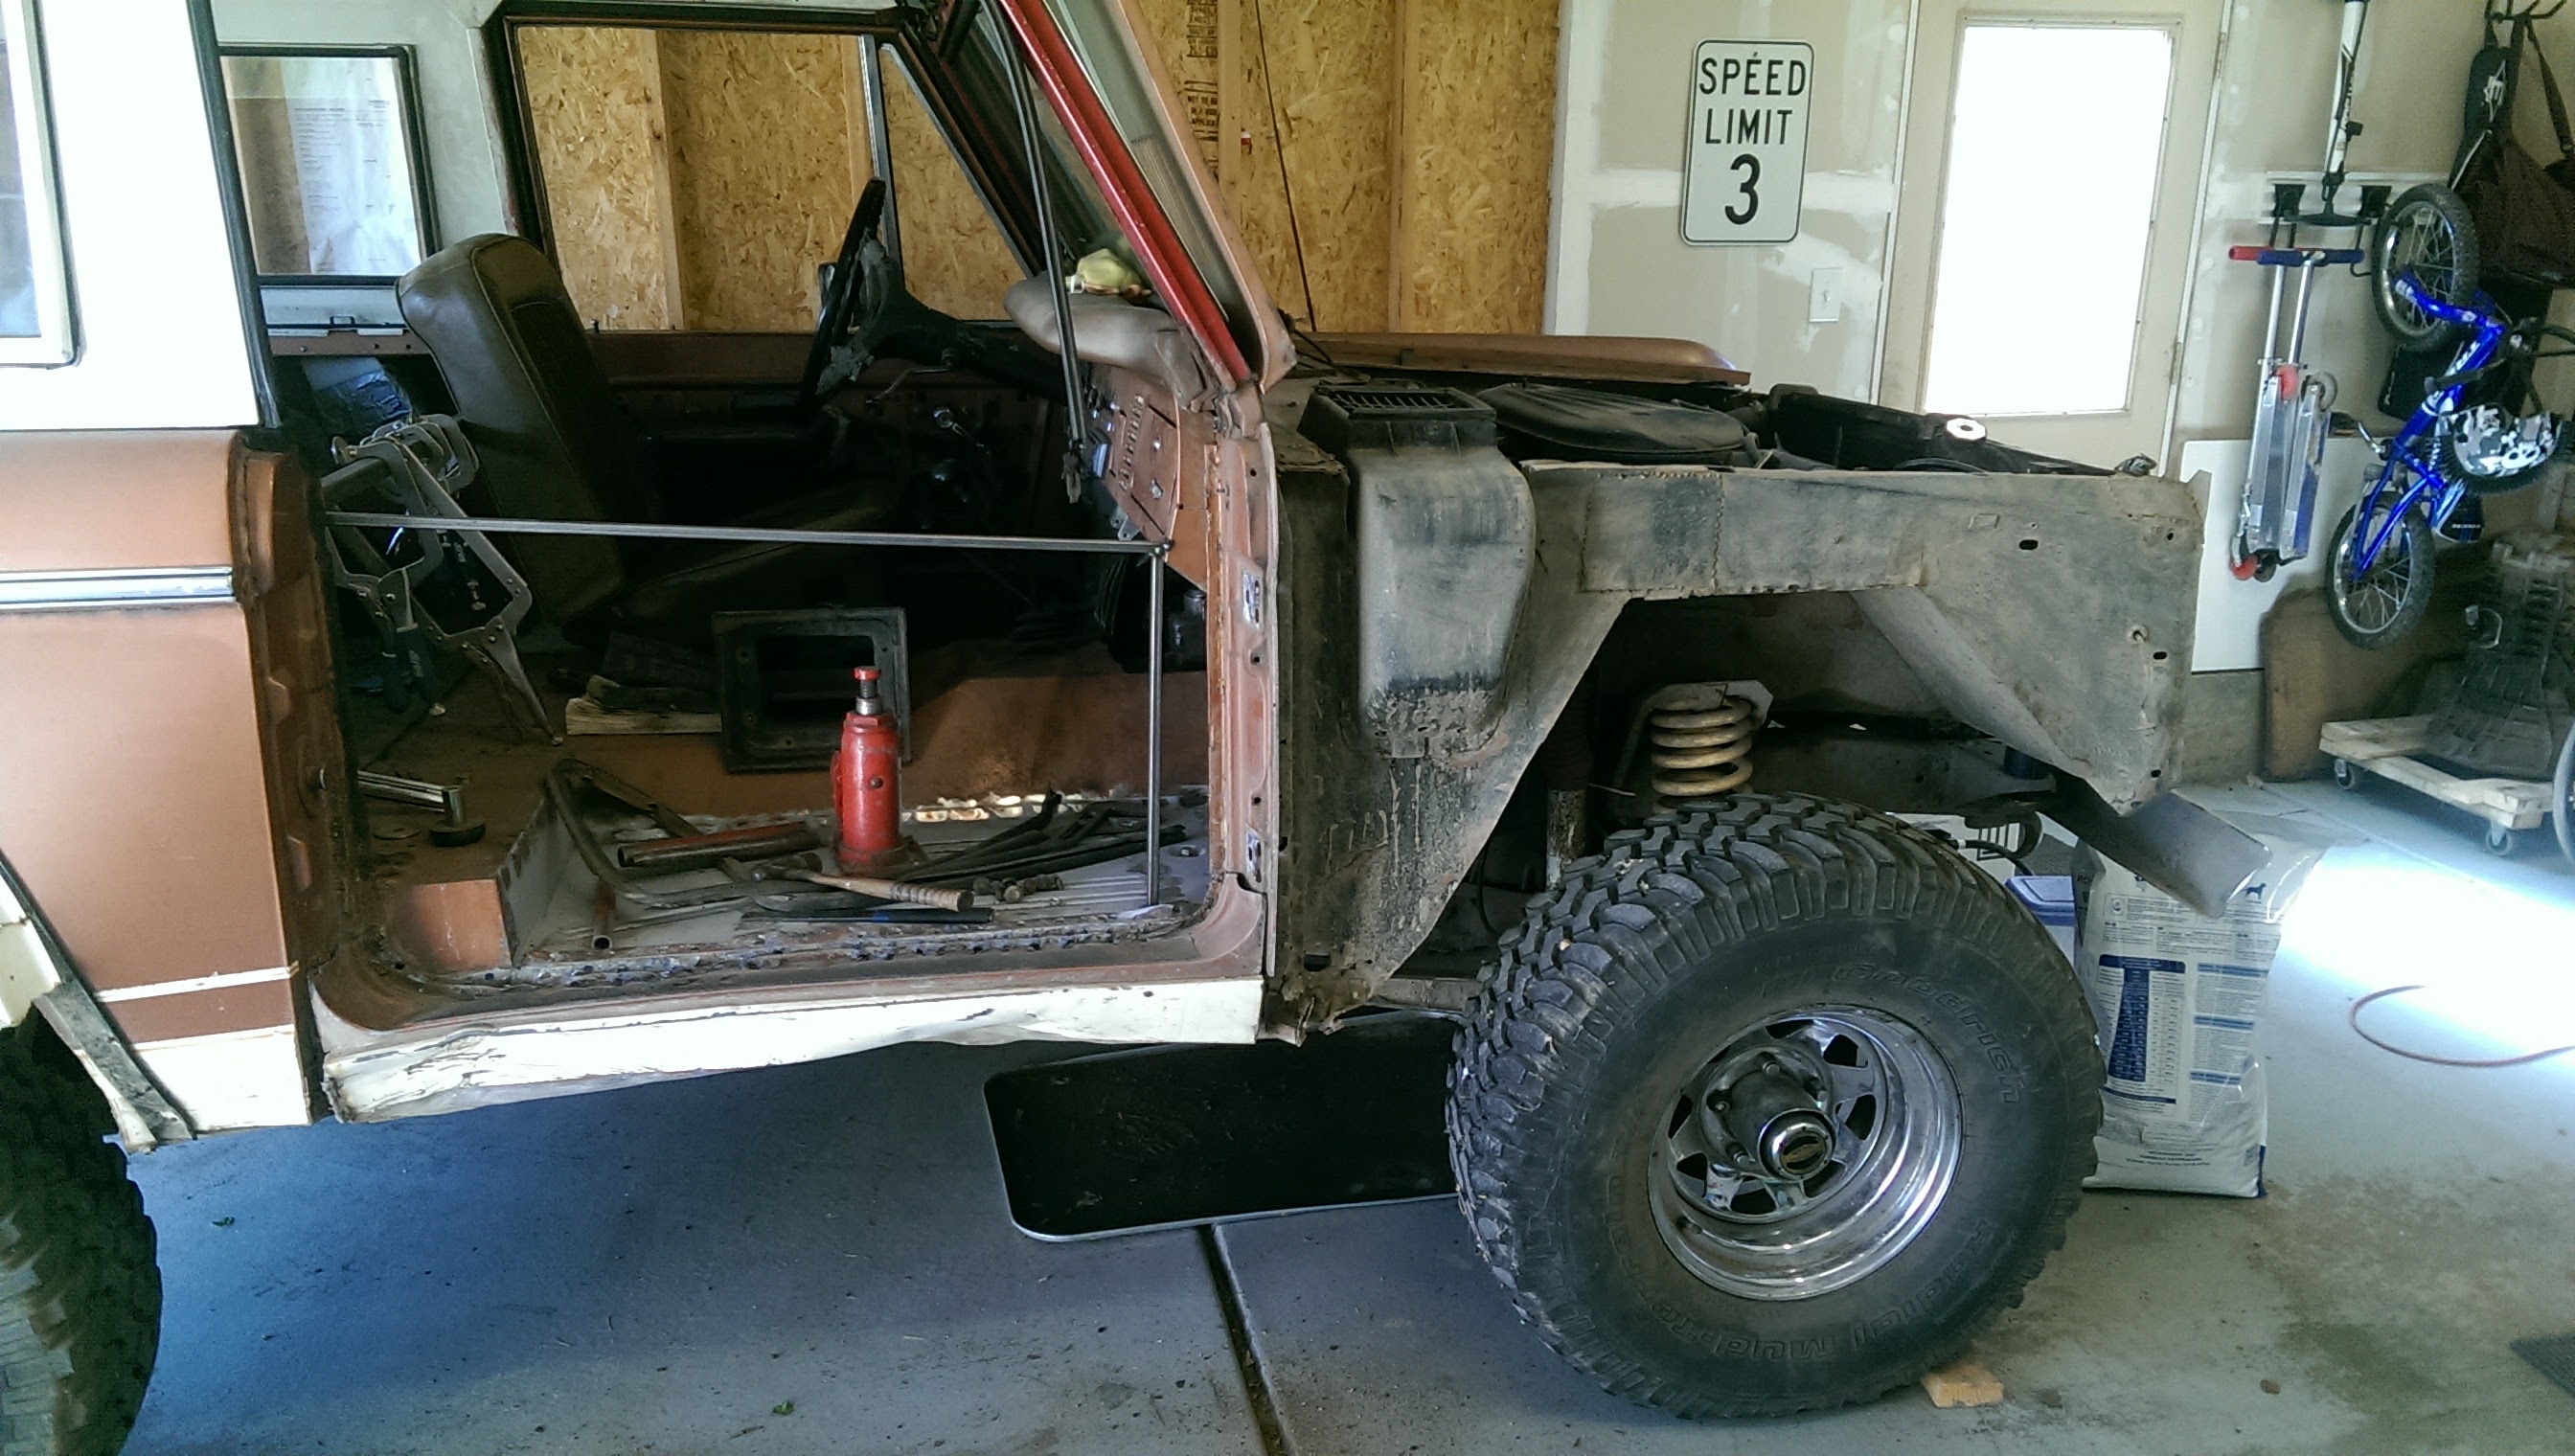 I had dropped the rocker on a rock in the Carnage Canyon outside of Boulder 12+ years ago. Found a wasps nest inside the rocker:  Here is a close up of the door post: 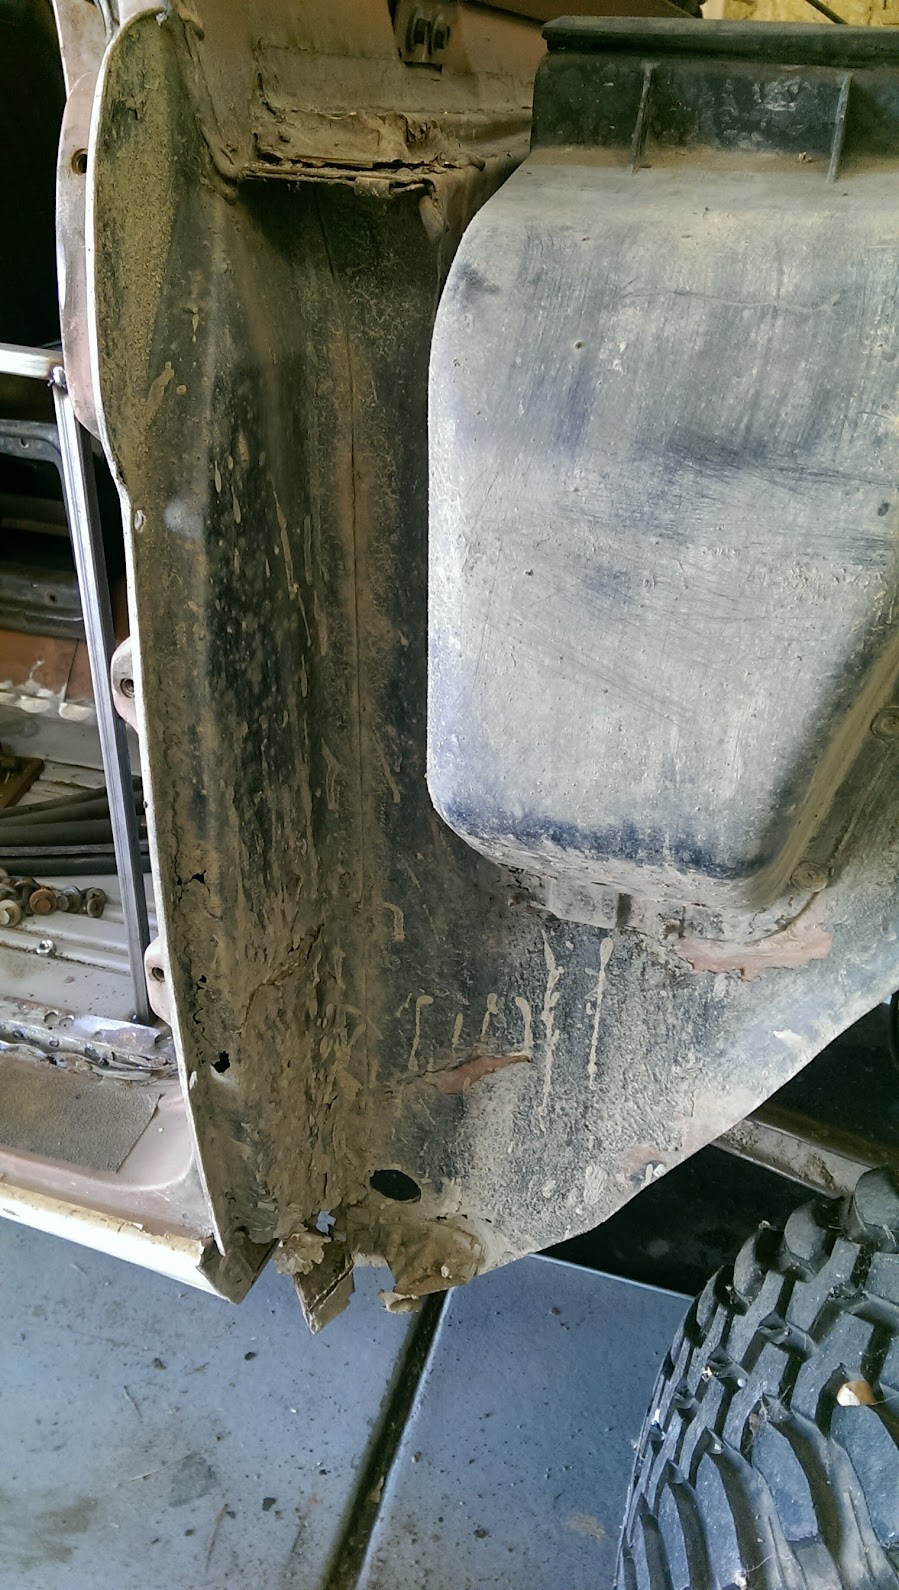   Here is the inner fender apron. I had collapsed the inner fenders back in high school when I put the fan through the radiator. Had it pulled straight and they welded those pieces in. They weren't really doing much anymore.    Doesn't help that the passenger side is the side that I flopped it onto at one point either. The inner fender is just messed up so I'm just replacing the entire thing. I got a little further than this but this was the last pic I took:  I cut out most of the inner rocker. I'm down to just the last little bit that is sandwiched inbetween the brace and the striker post. That was a PITA on the drivers side and is proving to be the same on this side. I busted my last Harbor Freight spot weld cutter and burned out yet another 1/8" drill bit so decided to call it quits for the day there. The one nice thing that I got was that the passenger side cowl is in really good shape. Just a very small bit of rust that I can easily make my own patch for on the upper cowl but the rest is rock solid. Here's hoping i can get the little things done this week so I can get the new metal screwed in place next weekend and committed. _________________ 1975 Ranger Edition that I've had longer than I've been without it. |
| Sun May 21, 2017 9:29 pm |
|
|
Official CCB Member  Joined: Fri Jun 21, 2013 8:53 pm Posts: 1276 |
Are you still on track for this weekend?
Looking good either way. _________________ Cummins R2.8 diesel, ZF5, AtlasII, HP44/BB9, ARBs, coiled / linked suspension, 37" KO2s, full cage, bumpers, etc. Build Thread: Average 23.5 mpg, Best tank: 25.1 mpg |
| Fri May 26, 2017 6:01 pm |
|
|
Official CCB Member Joined: Sat Oct 02, 2010 9:41 pm Posts: 1201 Location: Erie |
I'm hoping so. Got the inner rocker and the inner fender apron out. Working on the square right in front of the wheel well. New metal has been cleaned and coated in weld through primer.
Lord knows I need a lesson in sharpening drill bits. I've got a stack of 1/8 bits that are super dull. I'll be back at it tomorrow morning by 9am. Sent from my Venue 8 7840 using Tapatalk _________________ 1975 Ranger Edition that I've had longer than I've been without it. |
| Fri May 26, 2017 6:42 pm |
|
|
Official CCB Member Joined: Mon Jan 03, 2011 6:07 pm Posts: 4074 Location: Gardnerville, NV |
A Drill Doctor is a good investment. Also, cobalt bits seem to be the best. I bought a set from our Matco tool truck with a lifetime warranty. Spent more than the same set direct from Irwin (the bits are stamped 'Irwin'), but the warranty has already paid for the extra money I spent. Broke one? Swap it out! Dull one? Swap it out!
_________________ "America is at that awkward stage. It's too late to work within the system, but too early to shoot the bastards." – Claire Wolfe 74-AWB 98", ZF5, Atlas4, TGW HP1060 and HP1014 axles, ARBs, 37's, 3.5" lift-5.5" front coil springs, Tahoe rear springs, EFI 302, h-boost, York OBA, 4x4x2, custom dash & gauges 72 U15- Explorer Sport-Candyapple Red (1 of 141) |
| Fri May 26, 2017 7:12 pm |
|
|
Official CCB Member  Joined: Thu Nov 11, 2010 10:36 am Posts: 5984 Location: California |
I love my Drill Dr. as well!
_________________ 1973 Bronco, 351 SEFI, Locked, discs, 35's ZF-5spd and Atlas 4spd. 235:1 Crawl Ratio. It may be ugly, but it's slow. http://www.ucora.org |
| Fri May 26, 2017 7:25 pm |
|
|
Official CCB Member Joined: Sat Oct 02, 2010 9:41 pm Posts: 1201 Location: Erie |
Good to know on the Drill Doctor. The wife suggested one for Father's Day. Might have to take her up on that.
Not sure how far I will get tomorrow due to family plans so I figured I would show the progress of the 1 week goal. I started on the passenger side a week ago and this is what I got through today. First, my body hurts so bad from banging out spot welds with a spot weld cutter and seam separator. It doesn't help that my shoulder is jacked up and I'm just making it worse. Here is after I got most of the disassembly done:  I then realized based on the seat platform rust, I should pull the square in front of the wheel well. Here it is removed as well as the part of the seat platform that I need to replace:  Here is the seat platform replacement panel I made up:  If you look at the earlier pic, you can see how badly the inner front wheel well flange was destroyed when separating it from the inner fender apron. So, I cut out the really bad spots and welded in a new flange. 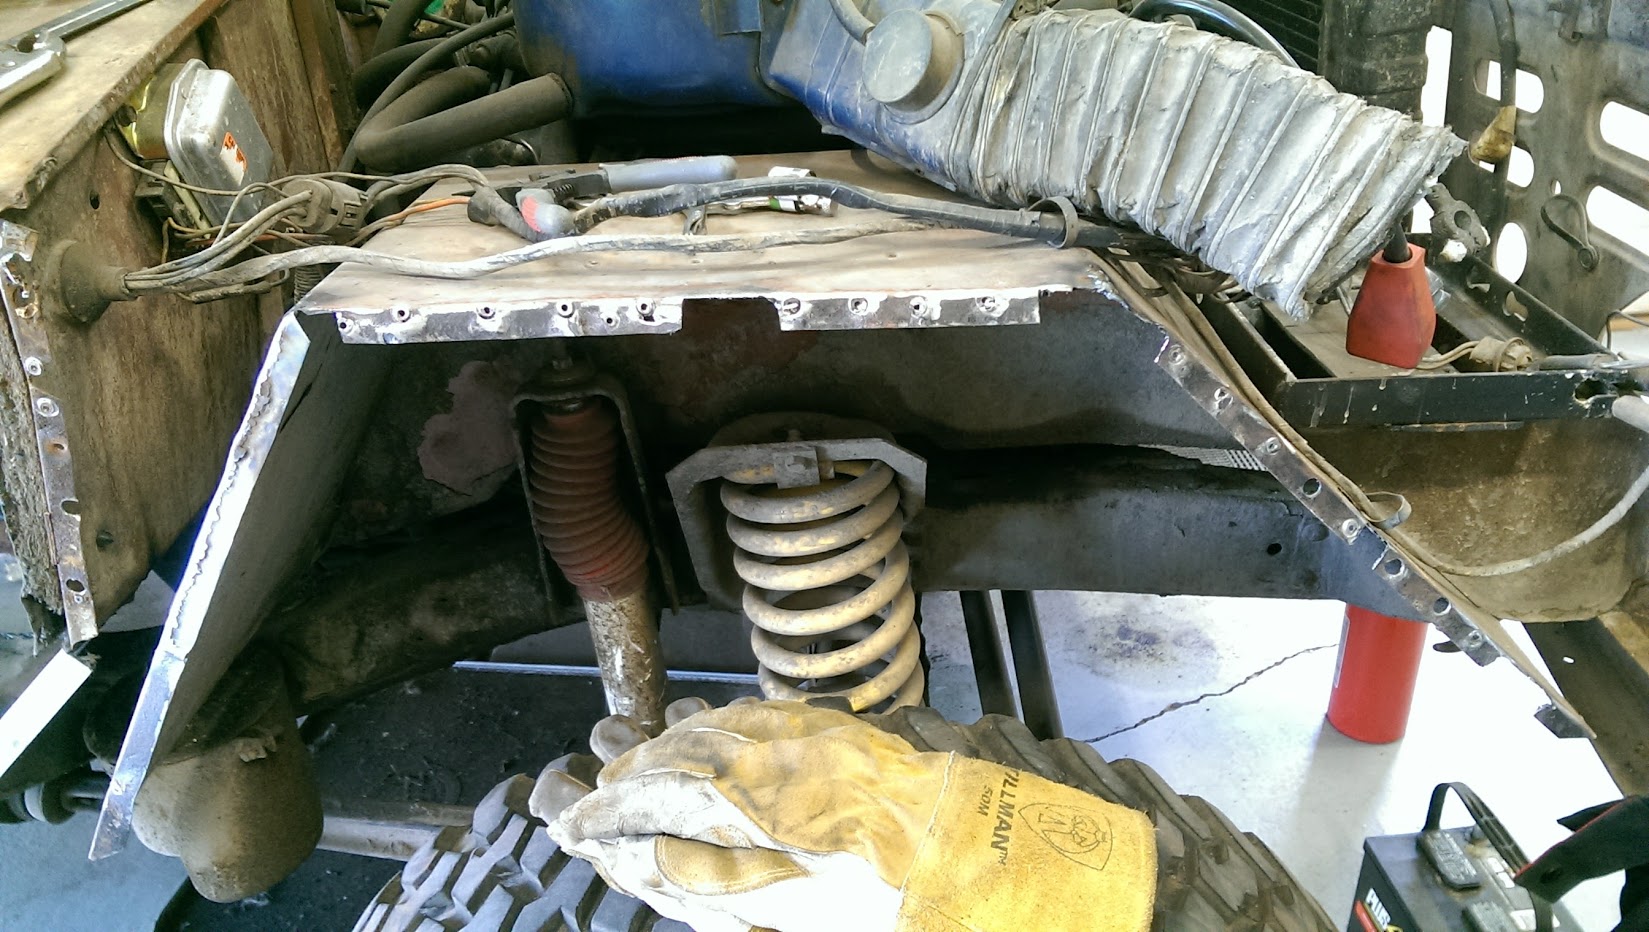    I skipped taking photos of some of the other "little holes" that I filled and fixed but here is the first attempt at fitting all of the new sheetmetal:  The door post measured out dead on on the first try. Too bad I had to take it off but after taking it on and off a few times to get the kick panel right, it looks like it will line up much easier than the drivers side did. I got the inner rocker welded in and the floor pan piece as well. If I get a few hours tomorrow, I'm hoping to get the kick panel screwed in along with the door post. Maybe I'll hang the door to see how badly I'm off. :) _________________ 1975 Ranger Edition that I've had longer than I've been without it. |
| Sun May 28, 2017 8:13 pm |
|
|
Official CCB Member Joined: Thu Nov 11, 2010 10:36 am Posts: 5984 Location: California |
You've done in a week what takes most of us months!! Keep at it and ice that shoulder so you can keep rockin'!
_________________ 1973 Bronco, 351 SEFI, Locked, discs, 35's ZF-5spd and Atlas 4spd. 235:1 Crawl Ratio. It may be ugly, but it's slow. http://www.ucora.org |
| Mon May 29, 2017 6:31 am |
|
|
Official CCB Member Joined: Sat Oct 02, 2010 9:41 pm Posts: 1201 Location: Erie |
_________________ 1975 Ranger Edition that I've had longer than I've been without it. |
| Tue May 30, 2017 10:23 am |
|
|
Official CCB Member  Joined: Sun Sep 11, 2011 10:49 pm Posts: 988 Location: Henderson, Co. Grand Lake, Co |
Looking great Adam!
 _________________ That guy John.... whatta Jerk. |
| Thu Jun 01, 2017 11:05 am |
|
|
Official CCB Member Joined: Sat Oct 02, 2010 9:41 pm Posts: 1201 Location: Erie |
So close, yet so far. Managed to get the door hung and adjusted:
 Looks pretty decent until you look closer.  I can fit my finger between the seal and the inside of the window frame at the bottom but the top is tight. A few more pics.     After sitting back and looking at it, a few thoughts are in my head. First, the entire door post needs to go down ever so slightly, maybe 1/8" or so. Second, the bottom of the door post needs to go forward 1/8-1/4". I tried to fit the outer rocker and it was way too long in the area that was there. I think if I do those adjustments, it will come out ok. The hard part is the rear quarter is bent so I think it is giving and optical illusion that the back gap is straight. All that said, not bad for 20 minutes worth of work on the first attempt to hang the door. I think I hung the drivers side like 10-15 times before I was happy with it. _________________ 1975 Ranger Edition that I've had longer than I've been without it. Last edited by phyler on Fri Jun 02, 2017 8:45 pm, edited 1 time in total. |
| Thu Jun 01, 2017 7:43 pm |
|
|
|
Page 4 of 9 |
[ 261 posts ] | Go to page Previous 1, 2, 3, 4, 5, 6, 7 ... 9 Next |
|
All times are UTC - 7 hours [ DST ] |
Who is online |
Users browsing this forum: No registered users and 4 guests |
| You cannot post new topics in this forum You cannot reply to topics in this forum You cannot edit your posts in this forum You cannot delete your posts in this forum You cannot post attachments in this forum |